
Desserts
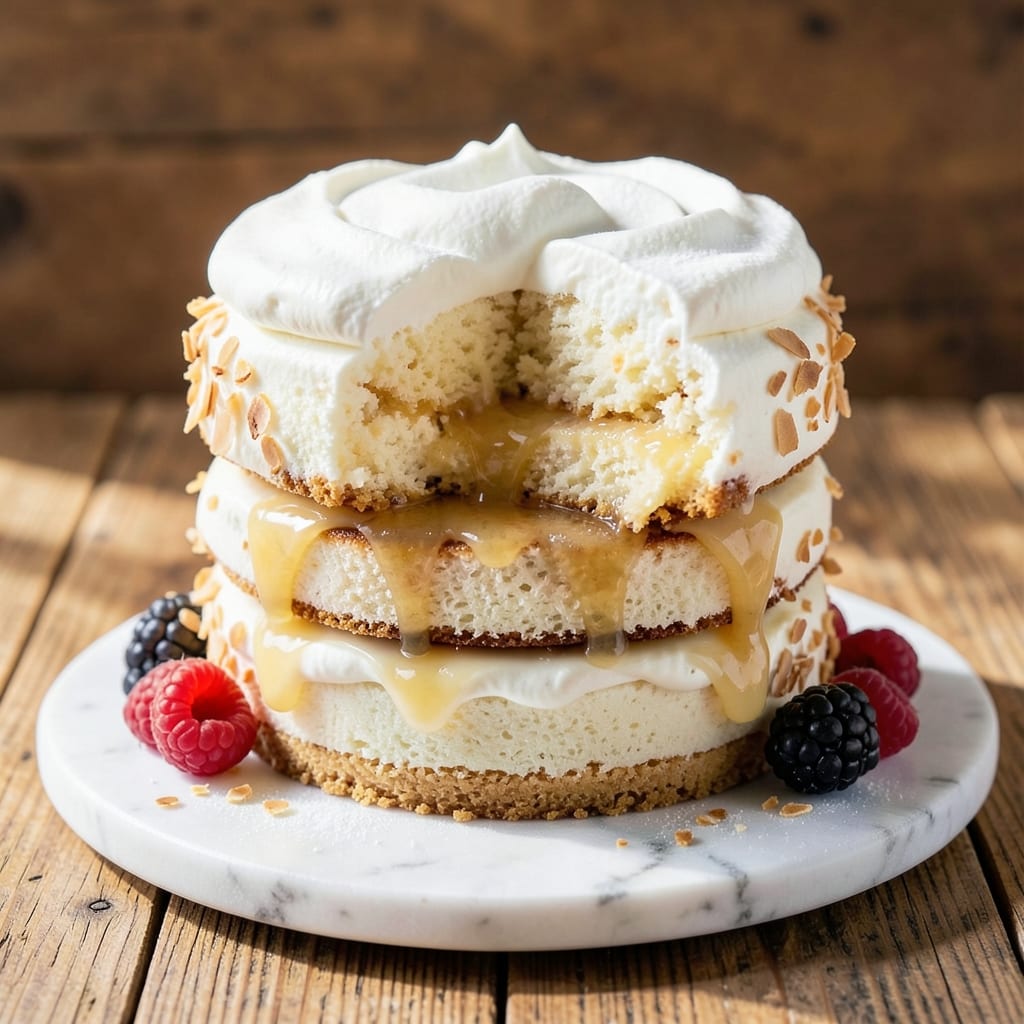
This 3-layer tres leches cake recipe delivers the perfect balance of light sponge, creamy custard, and velvety whipped cream—each layer soaked in a luscious blend of evaporated milk, condensed milk, and heavy cream. The secret lies in baking tender, moist sponge layers that absorb the tres leches mixture without turning soggy, while the vanilla swirls add a touch of elegance. I've perfected this classic Latin American dessert over years of baking, ensuring every slice is rich, creamy, and impossible to resist.
The beauty of this recipe is in its simplicity: three basic sponge layers baked separately, then stacked with layers of custard and whipped cream. The tres leches mixture, made with equal parts evaporated milk, condensed milk, and heavy cream, is poured over the cake in stages, allowing each layer to soak up the creamy goodness. The result? A dessert that's light yet decadent, with a texture that's dangerously close to melting in your mouth.
What sets this version apart is the vanilla swirls—a modern twist that adds visual appeal and a subtle vanilla flavor that complements the creamy filling. Whether you're serving it for a special occasion or just craving a classic dessert, this cake is sure to impress. The key is patience: letting the cake rest before slicing ensures clean, perfect portions every time.
Ready to bake? This recipe walks you through each step—from baking the sponges to assembling the layers and soaking them just right. With just a few simple ingredients and a little time, you'll have a tres leches cake that tastes like a trip to your favorite Latin bakery. Let's get started!
Ingredients for 3 layer tres leches cake
Simple ingredients transform into a showstopping cake with layers of vanilla sponge and creamy tres leches.
| Ingredient | Amount | Notes |
|---|---|---|
| All-Purpose Flour 🌾 | 3 cups | Sifted for light sponge layers |
| Granulated Sugar 🍚 | 2 cups | Divided for sponge and custard |
| Unsalted Butter 🧈 | 1 cup | Room temperature, softened |
| Large Eggs 🥚 | 6 whole | Room temperature, separated |
| Vanilla Extract 🌿 | 2 tsp | Pure vanilla preferred |
| Evaporated Milk 🥛 | 12 oz | Full-fat for creaminess |
| Sweetened Condensed Milk 🥛 | 14 oz | Quality brand preferred |
| Heavy Cream 🥛 | 12 oz | Full-fat for best texture |
| Granulated White Sugar 🍚 | ½ cup | For vanilla swirls |
| Vanilla Bean Paste 🌿 | 1 tbsp | Or 1 tsp vanilla extract |
| Whipped Cream 🧈 | 4 cups | Stabilized with powdered sugar |
| Powdered Sugar 🍚 | ½ cup | For dusting and whipped cream |
| Ground Cinnamon 🌿 | ½ tsp | Optional for garnish |
The flour and sugar are your foundation—King Arthur or Gold Medal flour works best for tender layers. Butter matters here: Land O'Lakes or Plugrá brands melt smoothly without graininess. Eggs should be room temperature (pop them out of the fridge 30 minutes before baking). For the tres leches, Eagle Brand condensed milk is my go-to—it's the most reliable. Heavy cream should be cold when whipping to avoid buttering out. Grab a 12-inch round pan for even layers, or use three 8-inch pans if you prefer individual cakes.
No vanilla bean paste? Double the vanilla extract—just add both teaspoons. Running short on evaporated milk? Whole milk heated until reduced by half works in a pinch, but the canned version has better consistency. The vanilla swirls are non-negotiable for that restaurant-quality look—mix the sugar and vanilla paste until it becomes a thick paste. For the whipped cream, Cool Whip works in a bind, but homemade with powdered sugar and a pinch of salt is worth the effort. If you're making this ahead, assemble the cake 4 hours before serving—it needs time to soak up all that creamy goodness.
Store the assembled cake in the fridge for up to 3 days—it actually tastes better the next day as flavors meld. For longer storage, wrap tightly in plastic wrap and keep frozen for up to 2 months. Bring to room temperature before serving. The whipped cream? Add it fresh before serving—it won't hold up in the fridge. Leftovers? Slice and freeze individual portions for quick treats later.
Why You'll Love This Recipe
- No Mixer Needed: I swear by this recipe when my stand mixer’s on vacation. Whisking the butter and sugar by hand gives those fluffy layers—no electric help required. The eggs and vanilla blend in like magic, and honestly? The cake’s so tender, you’ll forget you didn’t use a machine.
- Creamy Dream Layers: That first bite? Pure satisfaction. The tres leches soak—equal parts evaporated milk, condensed milk, and heavy cream—turns each layer into a melt-in-your-mouth sponge. And the vanilla extract? It’s the secret weapon that makes this taste like a hug from your abuela.
- Party in a Box: This cake’s my go-to for birthdays, potlucks, or when I need dessert with zero fuss. Slice it, stack it, and watch it disappear—no one will guess it’s made with basic pantry staples. (Yes, even on a Tuesday night.)
- Leftovers That Last: Bake one, eat it for days. The tres leches keeps it moist for hours, so I often make it ahead for gatherings. Budget-friendly too—just flour, sugar, butter, and eggs stretch into a crowd-pleaser that costs next to nothing. My wallet thanks me every time.
Step-by-step instructions for tres leches cake
Here's how to build this dreamy layered cake with creamy perfection.
👨🍳 Step 1: Prepare the Cake Layers
Preheat your oven to 350°F and grease three 9-inch round cake pans with butter or baking spray, then line the bottoms with parchment paper. Sift together the 3 cups all-purpose flour, 2 teaspoons baking powder, and ½ teaspoon salt in a medium bowl. Set aside.
In a large mixing bowl, beat the 1.5 cups unsalted butter and 1 cup granulated sugar from the 2.5 cups total on medium speed until light and fluffy, about 3-4 minutes. Add the 6 whole large eggs, one at a time, beating well after each addition. Mix in the 2 teaspoons vanilla extract until combined.
Gradually add the dry ingredients to the butter mixture, alternating with the remaining 1.5 cups granulated sugar. Mix on low speed just until combined—don't overmix. Divide the batter evenly among the prepared pans. Bake for 25-30 minutes, or until a toothpick inserted into the center comes out clean. Let the layers cool in the pans for 10 minutes, then transfer to a wire rack to cool completely.
🥘 Step 2: Create the Tres Leches Soaking Mixture
While the layers cool, combine the 12 oz evaporated milk, 14 oz sweetened condensed milk, and 12 oz heavy cream in a large bowl. Whisk until the mixture is smooth and fully combined. This rich blend is what gives the cake its signature moist, creamy texture.
Once the cake layers are completely cool, place one layer on a serving plate. Carefully pour about one-third of the milk mixture over the layer, letting it soak through completely. Repeat with the remaining two layers, pouring the milk mixture evenly over each. Let the cake soak for at least 1 hour, or up to 4 hours in the refrigerator, ensuring each layer absorbs the creamy goodness.
🍳 Step 3: Prepare the Vanilla Swirls
In a medium bowl, combine the 4 cups whipped cream, 1.5 cups powdered sugar, 1 tablespoon vanilla bean paste, and 1 teaspoon ground vanilla bean. Using a hand mixer or stand mixer, beat on medium-high speed until the whipped cream is stiff and holds its shape when a spoon is lifted. This step is key for achieving those beautiful swirls that make this cake special.
Divide the whipped cream into three portions. If desired, pipe or spread a thin layer of the whipped cream over the soaked cake layers. Then, pipe the remaining whipped cream in decorative swirls on top of each layer, creating a marbled effect. This not only looks stunning but also adds extra creaminess to each bite.
⏰ Step 4: Assemble and Chill the Cake
To assemble, place one soaked cake layer on a serving plate. Carefully spread a thin layer of the whipped cream mixture over the top. Repeat with the remaining two layers, ensuring each layer is evenly covered with whipped cream. Once all layers are stacked, spread the remaining whipped cream over the entire top and sides of the cake, creating a smooth, creamy finish.
Refrigerate the cake for at least 4 hours, or preferably overnight. This chilling time allows the flavors to meld and the cake to set properly, ensuring each slice is perfectly moist and rich. The longer it chills, the better the texture becomes, so don't rush this step.
Pro Tips For Making 3 Layer Tres Leches Cake
- Bake Layers Low and Slow: Tres leches cake’s magic happens when the sponge layers bake just until set—no golden brown. I used to overbake them, and they’d turn dense. Aim for 285°F (140°C) and pull them out when a toothpick comes out with barely moist crumbs, not wet batter. The milk soaking does the rest.
- Whip Egg Whites Cold: Room-temperature eggs lose volume fast in this humid climate. I learned this the hard way—my meringue collapsed twice. Keep the whites in the fridge until the last minute, then whip them with a splash of cold water. They’ll hold their shape and give you that cloud-like texture.
- Poke Holes Like a Pro: Stabbing the sponge with a skewer? Do it before pouring the milk mix. I used to wait, and the layers would puff up unevenly. Poke holes in a grid pattern—about ½-inch apart—and press firmly. This ensures the milk soaks in evenly, not just pools on top.
- Chill the Cake Twice: Rushing the chilling step is how soggy bottoms happen. After baking, let the cake cool completely (yes, even if you’re impatient), then refrigerate for at least 4 hours. I skip this once and ended up with a syrup-soaked mess. Trust me, the second chill makes all the difference.
Pro cooking tips for this recipe
Layer Baking Perfection
Bake your sponge layers at 350°F for exactly 25-30 minutes—any longer risks dryness. I use a toothpick test for doneness, but also check the edges for golden color. Let layers cool in pans for 10 minutes before transferring to racks. This prevents cracking when assembling later. 🌟
Tres Leches Soaking
Pour the tres leches mixture in three equal stages—one-third per layer—rather than all at once. This ensures even saturation without making the cake soggy. Let it soak for at least 1 hour before adding whipped cream, giving the layers time to absorb fully. I like to chill the cake uncovered for 30 minutes between soaking and assembly to prevent condensation.
Whipped Cream Mastery
Chill your beaters for 10 minutes before whipping to achieve maximum volume. Add powdered sugar gradually—about ½ cup at a time—while beating to stabilize without over-sweetening. For swirls, pipe whipped cream directly onto each layer before stacking to create that signature marbled effect. A Wilton 1M piping tip works perfectly for this.
Assembly Secrets
Use a serrated knife to trim any uneven edges on your cake layers before stacking. Place a thin layer of whipped cream between each layer to act as a "glue" that holds the cake together. For extra stability, I sometimes add a thin layer of custard—about ¼ cup per layer—between the sponge and whipped cream.
Chilling Strategy
Refrigerate your cake on the middle rack—not the door—for even cooling. The ideal chilling time is 6-8 hours, but overnight is best. I find that cakes chilled overnight develop deeper flavor and a firmer texture that holds up better when sliced. For presentation, dust with powdered sugar—about 2 tbsp—just before serving.
Nutrition facts
Frequently asked questions
Can I make this cake without evaporated milk?
Yes! You can substitute by heating 1 cup whole milk until it reduces to ½ cup (about 10 minutes on medium heat). Cool completely before mixing with the condensed milk and heavy cream. The texture will be slightly less rich, but still delicious. For best results, use half-and-half instead of regular milk for creamier results.
How do I prevent my cake layers from cracking?
Cracking usually happens when layers cool too quickly or aren't fully set. Let your cake layers cool in pans for 10 minutes before removing, then transfer to a wire rack. Also, don't overmix the batter—just combine until smooth. For extra insurance, brush the tops of warm layers with a thin layer of simple syrup (½ cup sugar + ¼ cup water) before baking.
Can I make this cake ahead of time?
This cake actually tastes better the next day. Assemble the cake up to 24 hours ahead, then refrigerate uncovered. The longer it chills, the more the flavors meld together. For serving, add fresh whipped cream and dust with powdered sugar just before cutting. If storing longer than 2 days, wrap tightly in plastic wrap and keep in the fridge for up to 5 days.
What's the best way to slice this cake?
Use a serrated knife warmed under hot water for 10 seconds, then wipe dry. Dip the knife in hot water between each slice to create clean cuts. For perfect portions, slice into 12 equal wedges—about 1.5 inches wide at the base. Serve immediately after slicing to maintain the creamy texture.
Can I add other flavors to the tres leches mixture?
Yes! For a twist, mix in 1 teaspoon cinnamon or ½ teaspoon almond extract with the milk mixture. You can also add 1 tablespoon coffee liqueur for a mocha version. Just remember that stronger flavors may require adjusting the sweetness. Start with small amounts—you can always add more sugar if needed.