
Desserts
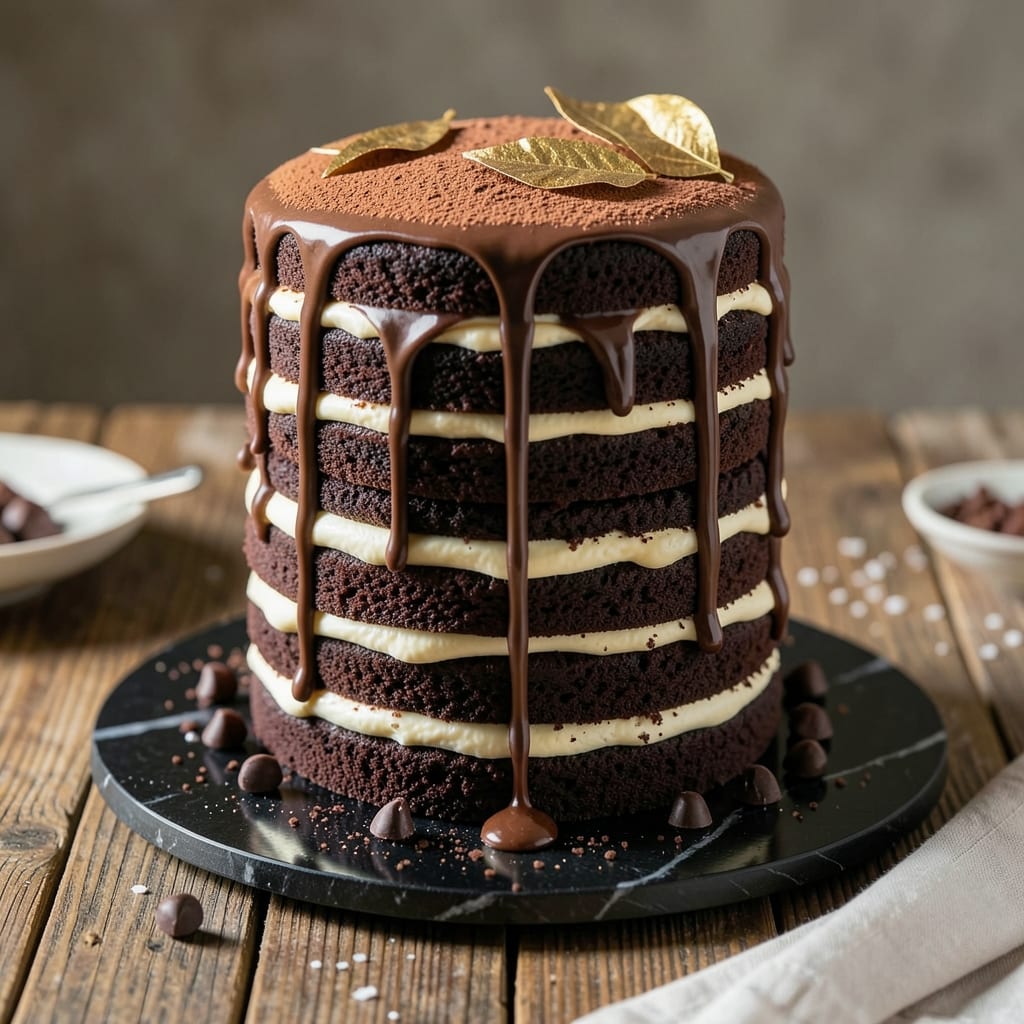
This 16-layer chocolate cake delivers the kind of dramatic height and rich flavor that makes every slice feel like a celebration. 🌟 The secret lies in perfectly balanced layers—each one fudgy yet tender, stacked with precision to create a towering masterpiece that rivals professional bakeries. What sets this apart is the foolproof technique for baking uniform layers and assembling them without collapse, ensuring every bite lives up to the visual spectacle.
Professional bakers swear by this method: baking the cake in 8-inch pans yields consistent layers that stack beautifully, while a dark chocolate ganache between each layer adds moisture and depth. The key to success is patience—letting each layer cool completely before frosting prevents soggy bottoms and ensures clean cuts. This isn’t just a cake; it’s a statement piece that demands attention at any gathering.
By the time you’re done, you’ll have a decadent tower with crisp edges, velvety crumb, and a glossy chocolate ganache that ties every layer together. The frosting isn’t just decoration—it’s the glue that holds this architectural dessert together while adding a smooth, creamy contrast to the fudgy layers. Whether for a birthday, anniversary, or just because, this cake delivers restaurant-quality results at home.
For those who love customization, you can add chocolate shavings, fresh berries, or gold leaf for extra flair. The beauty of this recipe is its adaptability—scale it up for a crowd or keep it intimate with fewer layers. Let’s get baking!
Ingredients for 16 layer chocolate cake
Sixteen layers of fudgy perfection—here’s what you’ll need to build a showstopping chocolate tower.
| Ingredient | Amount | Notes |
|---|---|---|
| Unsalted Butter 🧈 | 2 cups | Room temperature, high-quality preferred |
| Granulated Sugar 🍚 | 3 ½ cups | White or light brown for balanced sweetness |
| Dark Chocolate Chips 🍫 | 2 ½ cups | 70% cocoa or higher, chopped fine |
| All-Purpose Flour 🌾 | 4 cups | Sifted, plus extra for dusting |
| Cocoa Powder 🍫 | 1 cup | Dutch-processed for smoother texture |
| Baking Powder 🧂 | 1 tbsp | Freshly opened for best rise |
| Salt 🧂 | ½ tsp | Fine sea salt preferred |
| Large Eggs 🥚 | 8 whole | Room temperature for even baking |
| Vanilla Extract 🌿 | 2 tbsp | Pure Madagascar bourbon preferred |
| Whole Milk 🥛 | 1 ½ cups | Room temperature for smooth batter |
| Dark Chocolate Bars 🍫 | 1 ½ lb | 70% cocoa or higher, chopped |
| Heavy Cream 🥛 | 1 ½ cups | Cold for perfect ganache |
| Buttercream Frosting 🍰 | 3 cups | Homemade or high-quality store-bought |
| Chocolate Shavings 🍫 | ½ cup | For decorative garnish |
| Fresh Berries 🍓 | 1 ½ cups | Optional for garnish |
The butter and chocolate are non-negotiable here. European-style unsalted butter (like Plugrá or Land O’Lakes European Style) gives the richest flavor, but any high-quality brand works. For the chocolate, Valrhona or Callebaut bars are ideal, but Ghirardelli or Nestlé Toll House chips chopped fine will do in a pinch. The cocoa powder? Dutch-processed (like Hershey’s Special Dark) ensures a smoother, less bitter cake. Grab your ingredients at Williams Sonoma or the baking aisle of Whole Foods—they’ll have the good stuff.
No vanilla extract? Vanilla bean paste at half the amount works beautifully. Running low on eggs? Flax eggs (1 tbsp ground flaxseed + 3 tbsp water = 1 egg) keep the cake moist, though texture might differ slightly. The milk can be swapped for heavy cream at half the amount for extra richness. For the chocolate ganache, use only high-quality chocolate—no substitutions here. The ganache is what binds those layers together, so don’t skimp. If you’re feeling fancy, add a splash of espresso powder (1 tsp) to deepen the chocolate flavor.
Store the cake layers in airtight containers between parchment paper for up to 3 days at room temperature, or freeze for 2 months. The ganache can be made 1 day ahead—just reheat gently before assembling. For the final presentation, keep the chocolate shavings and berries refrigerated until serving. This cake is a project, so break it into stages: bake layers in batches, let them cool completely, and assemble one layer at a time. Patience is key—rushing leads to collapse.
Why You'll Love This Recipe
- No-Fuss Layers: I swear, the alternating buttercream and cake layers go together faster than you can imagine—just fold, chill, repeat. No piping bags, no stress, just pure stack-and-slice simplicity.
- Rich Without Guilt: That dark chocolate chips melted into the batter? Chef’s kiss. The cocoa powder and sugar caramelize just enough to give it a deep, velvety bite—like a decadent dessert that still feels balanced.
- Party Ready: Between us, this cake is my secret weapon for birthdays, holidays, or even "I just need cake" moments. The layers hold up beautifully, so you’re not stuck scrambling last-minute.
- Budget-Friendly Luxury: Butter and sugar make it taste like a bakery showstopper, but honestly? The ingredient list is shockingly affordable. Plus, leftovers? They’re the best—moist for days, no dry crumbs in sight.
Step-by-step instructions for 16-Layer chocolate cake
Here's how to build a towering masterpiece with perfectly balanced layers and velvety ganache.
👨🍳 Step 1: Mix the Cake Batter for Fudgy Layers
Preheat your oven to 350°F and grease 16 standard cake pans (or use parchment rounds in a single pan if stacking). In a stand mixer, cream the 2 cups unsalted butter with the 3.5 cups granulated sugar on medium-high speed for 5-7 minutes until light and fluffy. Scrape down the bowl occasionally—I like to use a rubber spatula for this.
Add the 8 whole large eggs one at a time, mixing just until each is incorporated. Then fold in the 2 tbsp vanilla extract and 1.5 cups whole milk until smooth. In a separate bowl, whisk together the 4 cups all-purpose flour, 1 cup cocoa powder, 1 tbsp baking powder, and 0.5 tsp salt. Gradually add the dry ingredients to the wet mixture on low speed until just combined. Finally, fold in the 2.5 cups dark chocolate chips by hand—don't overmix or the layers will be dense.
🔥 Step 2: Bake and Cool the Layers
Divide the batter evenly among the prepared pans (about 2 tablespoons per pan if using standard rounds). Bake for 8-10 minutes—they should be just set in the center with a slight bounce. Immediately transfer to a wire rack and let cool for 5 minutes before removing from pans. This quick cooling prevents soggy layers.
While the cakes cool, prepare the ganache by melting the 1.5 lb dark chocolate bars and 1.5 cups heavy cream together in a heatproof bowl over simmering water. Stir until completely smooth, then let it cool slightly until it thickens to a spreadable consistency. This ganache will be your layer glue and moisture barrier.
🥘 Step 3: Assemble the Cake Layers
Place the first cake layer on a cake stand or plate. Spread a thin layer of the ganache (1-2 teaspoons) over the top, then add another cake layer. Repeat this process, alternating layers with ganache between each. For the final layer, spread ganache on top and sides. Chill the assembled cake in the refrigerator for 1 hour to set.
Here's the thing—don't rush this chilling step. The ganache needs time to firm up enough to hold the tower together. I like to place a small weight on top during chilling to prevent any shifting. This patience ensures your cake stays intact when you finally frost it.
🍳 Step 4: Frost and Decorate the Tower
Once chilled, spread the 3 cups buttercream frosting evenly over the sides and top of the cake, creating a smooth base. Use an offset spatula to achieve clean, sharp edges. For extra height, I build the frosting in layers—starting with a thin base layer, then adding more in stages to create that dramatic tower effect.
Garnish with the 0.5 cup chocolate shavings and 1.5 cups fresh berries arranged in a circular pattern around the base. This not only looks stunning but also adds a pop of color contrast against the deep chocolate. Let the cake sit at room temperature for 30 minutes before slicing to allow the frosting to set properly.
⏰ Step 5: Rest Before Serving (Critical!)
This is where most people mess up—don't cut into your cake immediately. Let it rest for at least 2 hours (overnight is even better) before serving. This resting period allows the ganache to fully set and the flavors to meld together. When you finally slice into it, you'll see perfectly clean layers with no crumbling.
The first cut should reveal the beautiful contrast between the fudgy cake layers, the glossy ganache, and the rich buttercream. Each slice should be moist, rich, and perfectly balanced in texture. Trust me on this—waiting makes all the difference in the final presentation and taste.
Pro Tips For Making 16 Layer Chocolate Cake
- MELT CHOCOLATE SLOWLY: I learned this the hard way—dumping chopped chocolate into hot butter makes it seize into a greasy mess. Instead, toss the chocolate chips in first, then pour the butter over them in a thin stream while stirring. The heat from the butter melts the chocolate evenly without scrambling it. (Yes, even if you're impatient like me.)
- WEIGH YOUR FLOUR: That "1 cup" of flour in your recipe isn’t foolproof—it varies wildly by scoop. Use a kitchen scale for the flour and cocoa powder; for this cake, aim for 120g flour and 20g cocoa per layer. The layers stay consistent, and you avoid the dense, dry texture that comes from overpacking.
- CHILL BETWEEN LAYERS: Skipping the 15-minute fridge break between layers is how you end up with a soggy, collapsed cake. After adding frosting, pop it in the fridge—not the freezer—just long enough to set. This keeps the structure intact while you assemble, and the final bake won’t turn your cake into a puddle.
- USE ROOM-TEMP BUTTER: Cold butter creates pockets of air that make your cake dense, and it doesn’t mix smoothly. Take the butter out 30 minutes before starting—it should be soft enough to press a fingerprint into but still hold its shape. Creaming it properly is the thing that matters most for that light, airy texture in every layer.
Best sauces and condiments for these flavors
Dark Chocolate Ganache
The star of this cake’s assembly is the dark chocolate ganache, which binds each layer with moisture and richness. I use 70% cocoa chocolate bars (like Valrhona Guanaja) melted with 1.5 cups cold heavy cream for a velvety texture. For extra depth, add 1 tsp espresso powder to the cream before combining—it enhances the chocolate flavor beautifully. Spread 1-2 teaspoons between each layer, then chill the cake for 1 hour to let it set. This ganache isn’t just filling; it’s the secret to that restaurant-quality clean slice. 🍫
Buttercream Frosting
Your frosting should be smooth, stable, and rich—not too sweet to overpower the chocolate. I prefer a Swiss meringue buttercream for its velvety texture, but a classic American buttercream (like Betty Crocker’s or homemade) works too. For extra stability, add 1 tbsp cornstarch to the powdered sugar mixture. Spread it in thin layers, building up the sides gradually to create that dramatic tower effect. A cooling rack helps prevent melting while you work. 🥄
Chocolate Shavings
For a luxurious finish, use a microplane to shave ½ cup dark chocolate (same 70% cocoa) over the frosted cake. The thin, delicate curls add visual drama and a subtle crunch. I like to press them gently into the frosting so they stay put. If you’re feeling fancy, add edible gold leaf or flaky sea salt for a gourmet touch. These shavings aren’t just decoration—they’re the first thing guests notice! ✨
Fresh Berries
Bright, acidic berries like raspberries or blackberries cut through the richness of the chocolate. Arrange 1.5 cups in a circular pattern around the base for a pop of color. For extra flair, skewer them with toothpicks so they stay in place. If using strawberries, slice them in half to create a ruffled edge along the cake’s sides. The contrast makes the chocolate layers look even more decadent. 🍓
Espresso Syrup Drizzle
Heat ½ cup simple syrup with 1 tbsp instant espresso powder until dissolved, then let cool. Drizzle 1-2 tablespoons over the top of the cake just before serving. This adds a bold, coffee-chocolate pairing that elevates the flavor profile. For a smoother finish, strain the syrup to remove any sediment. It’s a simple trick that feels like a pro move. ☕
Whipped Cream Dots
For a lighter touch, pipe whipped cream in small dots around the base or on top of the cake. Use a pastry bag with a star tip for a playful texture. I like to dust them with cocoa powder for contrast. These dots add a fresh, airy element that balances the dense chocolate layers. They’re especially great if you’re serving the cake warm. 🌟
Nutrition facts
Frequently asked questions
Can I make this cake with fewer layers if I don’t need 16?
This recipe scales beautifully. For a 6-layer cake, simply halve the batter and ganache amounts while keeping the same baking and assembly techniques. The key is maintaining the same ratio of ganache to cake layers—about 1-2 teaspoons per layer—to ensure stability. Just adjust your pan size accordingly (e.g., 6-inch pans for smaller layers).
Why does my cake collapse when I assemble the layers?
Most collapses happen when layers aren’t fully cooled or the ganache isn’t set properly. Always let each cake layer cool completely on a wire rack for 15-20 minutes before assembling. Chill the stacked cake in the fridge for at least 1 hour before frosting, and consider placing a small weight (like a cake board) on top during chilling. The ganache needs time to firm up—rushing this step is the #1 cause of disasters!
What’s the best way to store leftover cake?
Store your 16-layer chocolate masterpiece in an airtight container between layers of parchment paper to prevent sticking. Keep it at room temperature for up to 3 days or freeze for 2 months. For individual slices, wrap each in plastic wrap—this preserves the moisture and prevents the frosting from drying out. Thaw frozen slices at room temperature for 1 hour before serving.
Can I substitute the dark chocolate ganache with something else?
While ganache is ideal for binding layers, you could use a chocolate cream cheese frosting or chocolate pudding in a pinch. For best results, stick with ganache—it provides the perfect balance of moisture and stability. If you’re avoiding dairy, a vegan dark chocolate ganache (using coconut cream instead of heavy cream) works beautifully. Just ensure it’s thick enough to hold the layers together.
How do I transport this cake without it falling apart?
For transport, wrap the entire cake in plastic wrap, then place it in a sturdy cake carrier box. If moving it horizontally, support the sides with a cake board underneath. For vertical transport, secure it with cake straps or wrap it tightly in a blanket to prevent shifting. Never transport a cake that hasn’t been chilled for at least 1 hour—the ganache needs to be firm enough to handle movement.