
Desserts
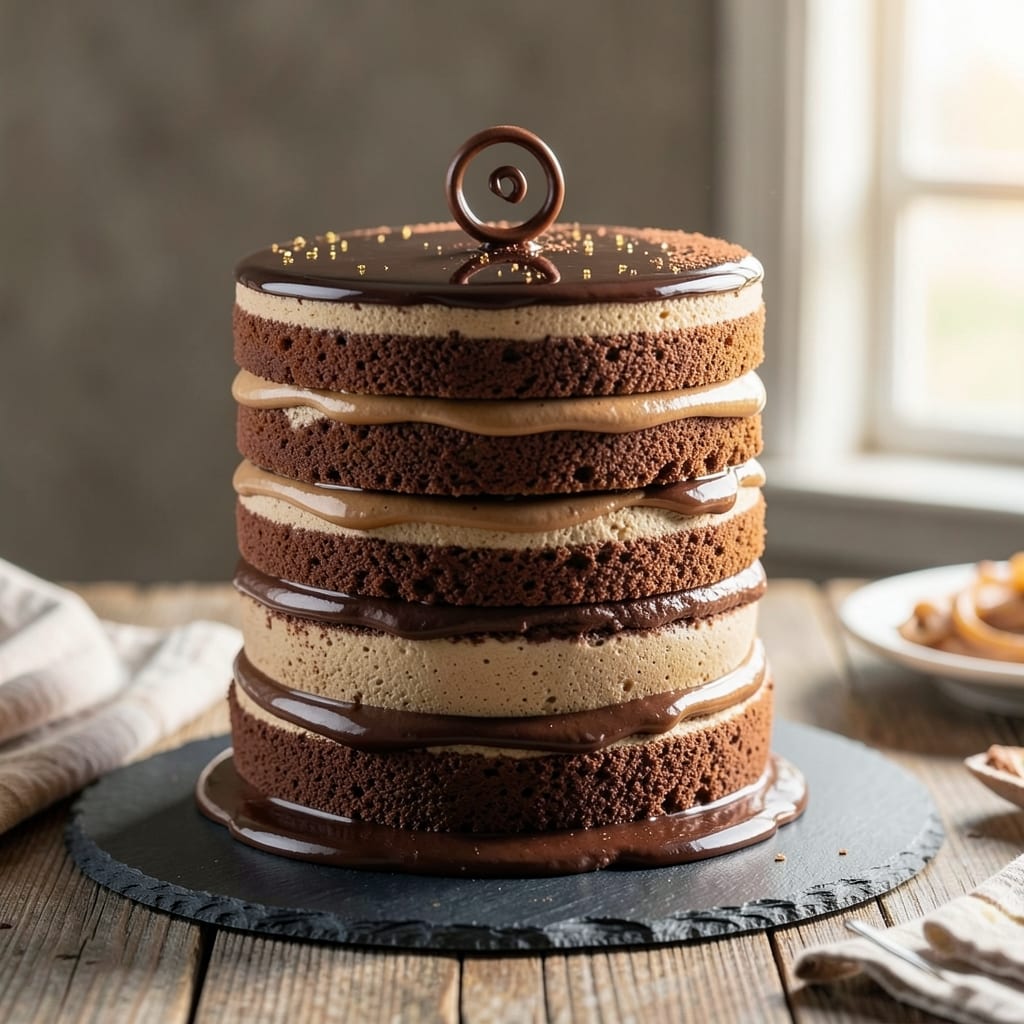
This 3-layer chocolate mousse cake recipe delivers the ultimate dessert experience—rich fudge cake, velvety mousse, and light sponge layers that balance texture perfectly. The secret lies in precise baking times and chilling stages, ensuring each layer holds its shape while maintaining moisture. Every bite reveals a harmonious contrast: dense yet tender cake, silky mousse that melts on the tongue, and a delicate top layer that crumbles just enough for contrast.
The foundation starts with a fudge cake base, baked to a golden finish and cooled completely before assembly. This dense layer anchors the cake, preventing sogginess while providing deep chocolate flavor. Between each layer, a silky chocolate mousse—whipped to peak softness—adds airy lightness without sacrificing richness. The top layer, a light sponge cake, stays tender yet sturdy enough to support the final presentation.
What makes this recipe foolproof is the step-by-step layering technique: spread mousse evenly, avoid overfilling, and chill between layers to set properly. By the final assembly, you’ll have a cake that’s visually stunning—smooth sides, clean layers, and a glossy ganache drizzle that ties everything together. Perfect for celebrations or indulgent self-treats, this dessert requires patience but delivers restaurant-quality results.
For presentation, consider dusting cocoa powder or adding chocolate shavings for extra flair. Serve chilled to enhance the mousse’s creaminess, and pair with fresh berries or a dollop of whipped cream. The key to success? Precision in each step—no shortcuts here, but the reward is a showstopping dessert that tastes even better than it looks.
Ingredients for 3 layer chocolate mousse cake
Precision ingredients for a showstopping chocolate mousse cake with perfect texture balance.
| Ingredient | Amount | Notes |
|---|---|---|
| Unsalted Butter 🧈 | 1 ½ cups | Cold, cubed for fudge cake |
| Granulated Sugar 🍚 | 2 ½ cups | Superfine preferred for smooth texture |
| Unsweetened Cocoa Powder 🍫 | 1 cup | Dutch-processed for rich flavor |
| All-Purpose Flour 🌾 | 1 ½ cups | Sifted, spooned into measuring cup |
| Baking Powder 🧂 | 1 ½ tsp | Aluminum-free for best results |
| Salt 🧂 | ½ tsp | Fine sea salt preferred |
| Large Eggs 🥚 | 4 whole | Room temperature for even baking |
| Vanilla Extract 🌿 | 2 tsp | Pure, high-quality extract |
| Heavy Whipping Cream 🥛 | 3 cups | Full-fat, cold for mousse |
| Semisweet Chocolate Chips 🍫 | 1 ½ cups | High-quality, 60% cacao |
| Powdered Sugar 🍚 | 1 ½ cups | For dusting and mousse |
| Cake Flour 🌾 | 1 ½ cups | For light sponge layer |
| Whole Milk 🥛 | ½ cup | Room temperature for sponge |
| Cocoa Butter 🍫 | ¼ cup | For ganache drizzle |
| Dark Chocolate Bars 🍫 | 8 oz | 70% cacao for ganache |
The fudge cake base demands high-quality cocoa powder—Valrhona or Callebaut elevate the flavor profile significantly. For the sponge layer, cake flour is essential to achieve that delicate crumb; brands like Gold Medal work well if you can't find specialty cake flour. Unsalted butter should be European-style for a richer flavor—Plugrá or Kerrygold are excellent choices. Chocolate chips and bars must be high-cacao content to avoid bitterness in the ganache and mousse; Ghirardelli or Lindt Excellence are reliable options. Always check expiration dates on cocoa powder and chocolate, as these ingredients lose potency quickly once opened.
Substitutions require careful consideration to maintain the cake's integrity. For the fudge layer, Dutch-process cocoa can be replaced with natural cocoa, but reduce the baking powder by 0.25 tsp to prevent over-rising. In the mousse, heavy cream can be substituted with coconut cream, though the texture will be slightly denser—ensure it's full-fat for best results. The sponge layer's cake flour can be swapped for all-purpose flour, but add 1 tbsp of cornstarch to mimic the finer texture. For the ganache, white chocolate can replace dark chocolate, but the flavor profile will be sweeter and less intense. If you're missing cocoa butter, extra dark chocolate chips melted into the ganache will work in a pinch, though the texture may be slightly grainier.
Proper storage ensures each layer maintains its quality. The fudge cake base can be baked a day ahead and stored at room temperature in an airtight container, wrapped in plastic wrap. The mousse should be prepared fresh or up to 24 hours ahead and refrigerated in a sealed container with parchment paper pressed directly against the surface to prevent a skin from forming. The sponge layer is best assembled the day of serving, but can be baked and stored briefly (4 hours) at room temperature. Fully assembled cakes keep well in the refrigerator for 3-4 days, though the mousse may firm up slightly—bring to room temperature before serving. For longer storage, freeze the assembled cake (without ganache) for up to 1 month, thawing overnight in the refrigerator.
Why You'll Love This Recipe
- Here’s what sold me: the crisp chocolate cookie base, the velvety mousse layer, and the buttery sponge in between. Honestly, it’s like a chocolate love letter to your taste buds, and the baking powder in that middle layer keeps it from being too dense. That first forkful? Pure satisfaction.
- I’ll be real: this recipe makes enough for a crowd, but I’ve never had to stress about leftovers. The mousse stays creamy for days, and the cookie crust gets even more addictive as it sits. (Yes, even on a Tuesday night.) It’s my go-to for meal prep because I can slice it up and grab a piece without reheating—just pure chocolate joy.
Step-by-step instructions for 3 layer chocolate mousse cake
Mastering this cake requires precision in each layer—here's how to build it flawlessly.
Prepare the Fudge Base Layer
Preheat your oven to 350°F and grease three 6-inch round cake pans. In a large mixing bowl, cream together the 1.5 cups unsalted butter and 2.5 cups granulated sugar on medium speed until light and fluffy, about 3-4 minutes. This step ensures proper aeration for a tender crumb.
In a separate bowl, whisk together the 2 cups all-purpose flour, 1 tablespoon baking powder, 0.5 cup cocoa powder, 0.5 teaspoon salt, and 2 teaspoons vanilla extract. Gradually add the dry mixture to the butter-sugar combination, mixing just until combined. Fold in the 12 ounces dark chocolate chips by hand to maintain even distribution.
Divide the batter evenly among the prepared pans. Bake for 25-30 minutes or until a toothpick inserted into the center comes out clean. Allow the layers to cool completely in the pans before removing—this prevents crumbling when assembling. The base should have a dense, fudgy texture with a slight crack on top when fully set.
Create the Silky Chocolate Mousse Filling
In a heatproof bowl, melt the 12 ounces ganache chocolate over a pot of simmering water, ensuring the bottom of the bowl doesn't touch the water. Stir until smooth, then remove from heat. Let it cool slightly before adding 1.5 cups powdered sugar and 3.5 cups heavy whipping cream that has been chilled until stiff peaks form.
Gently fold the melted chocolate into the whipped cream using a spatula, creating a mousse-like consistency. The mixture should be smooth with no visible streaks. For extra richness, incorporate the yolks from the 4 large eggs (reserve whites for the top layer) into the mousse. This step requires patience—overmixing can deflate the cream.
Transfer the mousse to a piping bag fitted with a star tip for even distribution between layers. Chill the mousse for at least 2 hours before assembling to ensure proper setting. The filling should hold its shape when piped but remain creamy at room temperature.
Bake and Assemble the Sponge Top Layer
Prepare the 1 box sponge cake mix according to package instructions using the 1 cup milk. Pour the batter into the third 6-inch pan and bake at 350°F for 18-22 minutes until golden and springy to the touch. Cool completely before slicing horizontally into three even layers—this creates the airy top tier.
To assemble, place the fudge base layer on a serving plate. Pipe a generous layer of the chilled mousse onto the base, spreading evenly to the edges. Place the first sponge layer on top, then repeat with another layer of mousse and the final sponge piece. The top layer should be level with the base for a balanced appearance.
For the finishing touch, whip the reserved 4 egg whites to stiff peaks and pipe decorative swirls or a simple border around the cake. Dust with additional powdered sugar for a professional finish. Serve immediately for the best texture contrast between the fudgy base, silky middle, and airy top.
Pro Tips For Making 3 Layer Chocolate Mousse Cake
- Sift That Cocoa: I learned this the hard way—lump-free cocoa powder is non-negotiable for a smooth mousse layer. Sift it with the flour and baking powder before mixing; it dissolves better and prevents gritty texture in your cake base. (Yes, even if you're impatient like me, take the 30 seconds.)
- Whip Butter to Room Temp: Cold butter in the cake batter? That’s a recipe for dense, greasy layers. Let the butter sit out for 45–60 minutes until it’s soft but not melted—press a finger into it, and it should leave a slight indent. Room-temp butter creams better with sugar, giving your cake that light, airy crumb.
- Chill the Cake Layers: Skip this, and your mousse filling will sink like a stone. After baking, let the cake layers cool completely, then refrigerate them for at least 2 hours (overnight is ideal). Cold layers hold their shape when you spread the mousse, so you don’t end up with a sad, collapsed middle.
- Fold, Don’t Stir, the Mousse: Overmixing the chocolate mousse turns it into a dense pudding. Use a spatula to gently fold the whipped cream into the chocolate mixture in broad strokes—just until combined. Stop when you see ribbons of white cream holding their shape. (Your future self will thank you.)
Make-ahead tips for leftovers
Fudge Base Prep
Bake the fudge cake base up to 2 days ahead and store it at room temperature in an airtight container wrapped tightly in plastic wrap. This prevents drying while maintaining moisture. When ready to assemble, let it sit at room temperature for 30-45 minutes before adding mousse—this ensures even spreading and prevents cracking. 🧈
Mousse Make-Ahead
The chocolate mousse can be prepared 24 hours in advance and stored in the refrigerator in a sealed container with parchment paper pressed directly against the surface. This prevents a skin from forming and keeps it silky. Before assembling, let it sit at room temperature for 15-20 minutes to soften slightly—this makes piping much easier. 🥛
Sponge Layer Strategy
Bake the sponge cake layers the day of assembly for the lightest texture, but if you must prep ahead, bake and store them at room temperature for up to 4 hours. Wrap each layer individually in plastic wrap to maintain freshness. Slice horizontally just before assembling to keep them from drying out. ✨
Full Assembly Timeline
For a seamless make-ahead plan, assemble the cake the night before and refrigerate uncovered for 4-6 hours to let flavors meld. Cover loosely with plastic wrap and store in the fridge for up to 3 days. Bring to room temperature before serving to restore the mousse’s creaminess. This method ensures layers stay intact without sogginess. ❄️
Freezing for Later
If you need to freeze the cake, assemble it completely (without ganache) and wrap it tightly in plastic wrap, followed by aluminum foil. Freeze for up to 1 month. Thaw overnight in the refrigerator before adding the ganache and serving. The mousse may firm up slightly but will soften at room temperature. 💫
Ganache Freshness
Prepare the ganache the day of serving for the smoothest drizzle. If you must make it ahead, store it in the refrigerator for up to 3 days in an airtight container. Reheat gently in a double boiler until smooth before drizzling over the cake. This keeps the ganache glossy and prevents graininess. 🍫
Nutrition facts
Frequently asked questions
Can I substitute regular flour for cake flour in the top layer?
Yes, but you'll need to adjust for texture. Replace 1.5 cups cake flour with 1.5 cups all-purpose flour plus 1 tablespoon cornstarch. This mimics cake flour's protein-to-starch ratio. For best results, sift the flour mixture thoroughly to prevent a dense crumb. The sponge layer will still be light but slightly less tender.
Why did my mousse turn grainy when chilling?
Graininess usually means the chocolate didn't cool enough before mixing or the cream was overwhipped. First, ensure your chocolate mixture cools to 110°F before folding into cream. Second, whip cream just to stiff peaks—no further. If grainy spots appear, gently reheat the mousse to 90°F and re-whip briefly to smooth it out.
How do I level the cake layers perfectly?
Use a long serrated knife or cake leveler for clean cuts. First, mark the desired thickness with a pencil around the cake's edge. Then, hold the knife at a 45-degree angle and gently saw back and forth while pressing down. Wipe the knife clean between cuts. For extra precision, use a cake jig or ask a friend to help stabilize the cake.
Can I make this cake without eggs?
Yes, but texture will change. Replace the 4 eggs in the fudge base with 1 cup applesauce plus 1 teaspoon baking soda. For the mousse, use 1 cup aquafaba (chickpea brine) whipped to stiff peaks instead of egg whites. The cake will be slightly denser, and the mousse may be less stable—chill it longer (3 hours) before assembling.
What's the best way to transport this cake?
Assemble the cake 24 hours ahead and refrigerate. Wrap the entire cake tightly in plastic wrap, then place it in a sturdy cake carrier or box. For transport, keep it in the carrier while in the car to prevent shifting. If traveling long distances, pack it with ice packs in a cooler to maintain temperature. Serve within 4 hours of transport for best texture.